Monday 2 June 2014

Independent Research

Looking and Seeing


-worksheet-
-----------------------------------------------------------------------------------------------------------------

Street Photography


Street photography is photographing life in general. More often than not it is actually shot on a street. There is never normally a particular subject, it is more focusing on capturing everyday life and people going about their everyday routine. Street photography is usually quite random, Street Photographers never normally sit and plan what they want their image to look like, but instead take pictures when they see the opportunity. 


The decisive movement is when a photographer captures an event, but also captures the whole meaning of the event and it is clearly seen in the image.


Juxtaposition is when you place two objects side by side to compare them or to show contrast between them. For example, in photography, you could take a picture of an insect and a leaf, to show the size comparison. 


When doing street photography there are many ethics to take into consideration. The image is mostly going to be of people, so it's important that you try any protect their identity, as some of them may not want to have their photo taken. It would be better if you tried not to get a shot of a person's whole face but of them at an angle or turning away, as that way it means that their face still isn't very clear but you still get a good shot. 

It is also important to make sure that you aren't taking any pictures of children, or if you are that you blur their faces out. For example if you are photographing a busy high street and there is a toddler in a pushchair, you have to blur their face out unless you have permission from their parents, otherwise it is illegal. 

You also have to be quite considerate towards people who aren't willing to have their photo taken. If they really object to it then it is better to just delete the photo and apologise to them, rather than cause a scene. 

You should also be mindful when photographing homeless people. Even though it would come across as a very powerful image, it isn't worth embarrassing someone and exploiting their living situation just for a picture that you think people might want to see. 


DO
-Photograph busy streets
-Take pictures of things that you feel capture everyday life
-Capture things out of the ordinary

DON'T
-Make a scene when a person doesn't want their picture taken
-Exploit peoples living situations for a piece of art
-Go for 'easy shots' ie. Street performers


I searched 'street photography' on Google images and had a look through and this is the picture that I liked the most. I like that it's so simple and it just looks like the photographer has just taken their camera out and taken a random shot, it doesn't look staged at all. It looks like it might have been taken in New York and it makes me feel quite wintry and christmassy, because of the snow. It also makes me feel quite happy. 


The photographer is Markus Hartel and he is based in NYC. His pictures are mostly in black and white and I like the fact that they all are because it keeps the pictures really simple and it doesn't come across as a big set up and as though it's staged. 

-----------------------------------------------------------------------------------------------------------------

Inspirational Photographer


There isn't really one photographer who I really like, but I do like the style of photography in Vogue. Although they use a different photographer for each new issue, I think the images in it are easily recognisable as pictures from Vogue. Even though each issue is different and some of the images are quite abstract, all of them still look classy and not overly staged.Although none of the photos are exactly the same, the running theme seems to be centred around fashion. A lot of the pictures seem to either be in black and white or quite calm colours, there are none that are extremely bright and eye catching. The Vogue photographs inspire me because they are all different and they make me want to come up with some more of my own original ideas.

http://www.vogue.co.uk/

-----------------------------------------------------------------------------------------------------------------

My Favourite Photo


My all time favourite photo is the 'Lunch atop a Skyscraper' which was taken during the construction of part of the construction of the Rockerfeller Centre in New York. I really like it because it is really laid back and doesn't look as though it's been planned out, it just looks like someone had just picked up a camera to capture the moment. The image makes me happy because it's so simple, it's just taken on a normal day with normal people. 

Friday 30 May 2014

Photoshop Experimentation

Photoshop Experimentation 


Photoshop is the most commonly known and used editing software in photography. It can do almost anything that you want to do to your image, including adjusting the hue and saturation, changing the brightness, tracing around it, cropping it, adding things in etc. In the media industry it is used for many different things, for example in the Fashion media industry, it is used to edit pictures of models and celebrities to make them look better and make the image more appropriate for a front cover. In the Photo-journalism area, it is used more to sharpen the image and make it clearer to see what it happening, it's not really used to change anything drastic. The subject of Photoshop is quite a controversial one, with one of the biggest debates coming from the Fashion media area- Should Photoshop be used to edit people so drastically? These has been a debate going for many years as to whether Photoshop should be used sparingly on models and celebrities, and if editors should stop going to such lengths to make the image,and person, look perfect. There is also an argument on the image that all this extreme Photoshopping is sending to younger audiences, as well as the role models it is creating. Photoshop is quite vital to the media industry, as it helps to make the images more polished and effective, it captures peoples attention, which is what the industry is all about.

I will be experimenting with a range of techniques using Photoshop CS, including;
-Layering
-Adjusting Hue/Saturation
-Brightness/Contrast


----------------------------------------------------------------------------------------------------------------------------------

Jasper James

I researched the photographer Jasper James, who is most famous for his city scape silhouette images. I used Photoshop to create and image inspired by one of Jasper James' pictures.


Out of all the pictures I looked at, these are my two favourites by Jasper James. I'm not too sure why they are my favourites but they stood out to me more than any of the other photos. After researching, I then got to make my own Jasper James inspired image using Photoshop. 

For the city skyline picture, I decided to use a picture of New York, and for the silhouette that was going to be layered on top, I decided to use a picture of my friend.


These were my original images. Once I'd opened them in Photoshop, I used the magnetic lasso tool to cut around the profile of my subject. I then had to change the background of the image so that it was white, and then place it over the top of the city picture. After I'd done that, I just had to change the opacity of my first image so that you were able to see the city outline behind the silhouette.


This was my final image. I was really happy with the way it turned out.
--------------------------------------------------------------------------------------------------------------------------------

Manipulating Images with Photoshop


I was given a Photoshop tutorial that taught you how to get rid of spots and blemishes. We were given an image that we had to edit, and a step-by-step guide on how to go about editing it.


This was the original image. To get rid of any blemishes, I had to use the 'Spot Healing' brush tool. The tool works by taking the skin tone from another part of the face, any part that you want to use, and then you have to click on the actual blemishes and blend them in, to make it look completely blemish free. I found that it was easier to zoom in on the area of the image that you wanted to focus on, as it meant that I could be more thorough and I'd know if I'd missed any spots.


This is the image after editing. I think it looks quite natural and you can't really tell it's been edited. I think this tool is most suited for when you are editing pictures for things like catalogues and magazines, as it makes the image look more polished and professional, which is what you mostly see in glossy magazines.

As part of a different project, I went out and took pictures of Graffiti. After I'd taken them I used Photoshop to edit them and make them look a bit more like I wanted them to.


This was one of my original images before editing. I was really happy with the way it came out, but I just wanted to make the image look a bit more aged. I adjusted the hue and saturation on Photoshop to make the image look a bit older and like it had been taken on a film camera rather than DSLR. I also changed the brightness to make the picture a bit lighter. 


----------------------------------------------------------------------------------------------------------------------------------


Thursday 29 May 2014

Composition Research

There are many rules of composition generally used in photography. These are mostly used as guidelines to help to create balanced and unique images. I think it's important that the creative rules are challenged otherwise there would be no new and unique pieces created, everyone would be following a guide as to how their image should look. I will be attempting to explain these rules and give examples of images that I've either found on the internet or using my own original images. I will also try to challenge the guidelines and see how my attempt pans out.

In this section I will be looking at;

  • Rule of Thirds
  • Leading Lines
  • Negative Space
  • Depth of Field
  • Cropping
----------------------------------------------------------------------------------------------------------------------------------

The Visual Elements

Shape - Shape is also very important when taking pictures. It helps whoever is looking at the images to identify the subject and see what it is. The shape is often best identified when the object is backlit or front-lit.
Form- Form adds more of a dimension to the images. Where the majority of pictures are two dimensional, 'form' brings a third dimensional feel to it.
Tone- Tone is often the black and white shades of a picture. It's not very noticeable once the whole picture has been edited and there are other elements added in, but it also makes the picture appear more three dimensional.
Colour- Colour in photographs helps the photographer to make the image have more emotion in it, eg; Blue suggests sadness, Yellow suggests happiness etc..
Space- Space can be good or bad depending on the picture and what it's subject is doing. For example, if you have one person in a picture and she is looking off into the distance, if you crop the picture too much and leave no space for her to be looking into, it is going to make the picture seem too constricting. However, if the subject is making direct address with the camera, it won't matter if the picture is tightly cropped, as the focus is not on the space in the picture.
Line- Lines are like the foundation for a good photo. Without lines, there would be no shape. The lines in an image can be horizontal, vertical, diagonal or curved. They help to move your focus towards a certain part of the image. Lines lead you to the focal point of the picture.

----------------------------------------------------------------------------------------------------------------------------------

Rule of Thirds

A big technique in photography is the 'Rule of Thirds' technique. This is when you have a grid over your photo, which helps to make the image look more balanced and focused. It also helps to make the image look more symmetrical and lined up. 

I took some photos, some using the Rule of Thirds grid, and some not.

 This is the rule of thirds grid. 


When I took this I didn't use the rule of thirds grid. I don't really like it as the background isn't very focused and it's not really staged that well. 

 I took this photo using the rule of thirds grid. I think it looks a lot better as the background is also in focus. 


----------------------------------------------------------------------------------------------------------------------------------


Leading Lines

Leading lines are used in photography to direct the viewers eye to wherever it is that the photographer wants them to be looking at. 

----------------------------------------------------------------------------------------------------------------------------------

Negative Space

Negative space is the area around the subject in the photograph. It is mostly empty so it draws attention to the main focus of the picture, as well as making the image appear less cluttered and busy. It is called Negative Space because the area isn't really being used for much, but areas where an object or subject is being photographed is called positive space. It is called this because the space is being used to create a main focal point.


----------------------------------------------------------------------------------------------------------------------------------

Depth of Field

Depth of Field is the distance in front and behind the focus point of a photograph, which appears quite sharp. For example, if you were to photograph a tree and just have the tree in focus, there would still be a small area in front and behind the tree that would appear in focus. If you blur the rest of the background so as just one object is in focus, this is called a shallow depth of field. Shallow depths of field are used to direct the viewers eye toward that one object, and making it the focal point and making sure their attention is mostly on what it is you want them to see. Pictures with a shallow depth of field sometimes look better that ones where the whole image is in focus, because it means that the subject appears very detailed and contrasted. 
----------------------------------------------------------------------------------------------------------------------------------

Cropping Images


Cropping images can be very useful in Photography. It gives the photographer the chance to look back at their images and notice things in the background that they may not have noticed whilst actually shooting it or when looking at it on a smaller screen. Cropping is one of the easiest parts of editing a photo, because it gives the photo a makeover instantly. If you had a car or something that took away from the picture, you can just crop it out and the image has changed already. Although you can crop using Photoshop on a computer or laptop, more and more cameras have already got a crop setting that you can use. 


Wednesday 21 May 2014

Creative Assignment


This was part of my initial research I did when we started our creative assignment. The topic I chose to do was "Broken Society", and I decided that I was going to photograph pictures of graffiti, and focus mainly on vandalism. I searched for Graffiti images on tumblr to help me develop my ideas a little bit further, and also to hopefully give me some inspiration.

I chose these images because I think they are really different and i'd never seen that type of art before. I'm not sure if the first picture is classed as Graffiti or whether it is seen as street art and is allowed to be there. I also really like the second image, as it is also quite different. I think it is a Banksy piece, and I really like Banksy art because they are actually conveying a message rather than being there for the sake of writing on public property. 


Tuesday 6 May 2014

Lighting Techniques

Lighting Techniques

Photography, noun: 

1) The art or practice of taking and processing photos.

Lighting is very important in Photography. It helps to set the tone and mood of the image as well as help to make the subject look as good as possible. I will be looking at and talking about many different areas of lighting in Photography. 

The areas I will be looking at will include:

  • The difference between Hard and Soft light.
  • The studio set up of Three Point Lighting.
  • Silhouettes - shooting into the sun. 
  • Light Direction
  • White Balance - Colour of light. 
  • I will also include research into colour and their meanings. 

------------------------------------------------------------------------------------------------------------


Hard and Soft Light

There are lots of light sources used in Photography, and depending on the conditions you're shooting in, they produce hard or soft light. If you are shooting a picture whilst facing the sun, hard light will be produced. Hard light creates very dark shadows around the subject. However, when you are shooting with the sun behind you, there will be soft light produced. Soft light still creates shadows, but they aren't as harsh and dark as hard light. 

It is good to use hard light when you are shooting quite a serious picture and want it to convey quite a serious mood. It is best to use soft light when shooting things like family pictures, as it isn't as dark. 


This picture shows an example of hard light. Hard light  creates shadows in pictures and creates quite a harsh light. The light source is coming from the top right corner and you can't see any detail from the sky in that corner. You also have the shadows on the floor coming from the building and the bin. Hard light is when you have the light in front of you when you take the picture. It often makes the subject appear in shadow and looking quite dark.


The light in this picture is soft light. You can see a lot more detail on the tree, like the berries growing on it. You can still see shadows on the building in the background but they aren't as harsh or noticeable  Soft light is when you have the light behind you while taking the picture, which is a more flattering light.


------------------------------------------------------------------------------------------------------------

Three Point Lighting


Three point lighting is made up of three certain points where light comes from. There is a Key light, which is the main source of light. A Fill light, which takes away any shadows and gives you a white background. There is also a hair light, which shines on the subject of the photo to separate them from the background and also contours them. Many people also have a white sheet hung up behind the subject, which just makes it easier for the photographer when it comes to editing. 
There are also some health and safety hazards when it comes to three point lighting, for example there is a trip hazards when there are leads trailing on the floor. There is also a risk of someone getting burned, as the lights can get really hot. 


------------------------------------------------------------------------------------------------------------


Light Direction


In Photography, there are many different directions that you can shoot to get different effects from your source of light. If you are shooting into the sun, you will mostly get silhouettes and outlines, whereas if you shoot with a side light, you will be able to see the features of your subject, but half of they face will be lit and the other half will be in shadow. Light Direction is used in many things, for example; 

  • Horror Films


This is a still image from 'The Woman In Black'. The light direction in this is coming from behind Daniel Radcliffe, where there are windows behind him. This makes the room very dark and shadowed, and adds to the creepy vibe of the film. As the actor walks further away from the light, he becomes a lot more like a silhouette and it means that the viewer cannot see everything that is going on in the room. This is a common light direction to use in horror films, as it makes everything a lot darker and add to the suspense and eerie feeling that you get when watching it. It is also used to bring an element of surprise, as it is hard to see anything that's in the rest of the room, meaning the viewer can't see if there is anything in there. 


  • Fashion Photography


Light direction is also used in Fashion Photography. In this image of Amanda Seyfried, the light is coming from in front of her. By using the light from this direction, it is mostly focused on her face, and it makes her skin look flawless. It adds to the polished, glossy effect that most magazines use, and also looks very classy. Most fashion photographers use this as it is quite a flattering light for most people, and takes away any blemishes on their skin. It makes their skin look clear and almost perfect, which is the look most magazines strive for. 


Silhouette Shots

A Silhouette is the dark shape and outline of someone or something. Silhouettes appear in pictures that are set against a bright background. Silhouette photography is often quite dark, which means it is quite good for when you want to take a more serious photo, perhaps for a horror film advert. Photographers are often told to shoot with the sunlight behind them so as not to create any silhouettes or shadows, but if you are shooting with the sunlight behind your subject, it brings a more intense look to the picture. 


This is an example of silhouette photography I found on the internet. 


We also looked at Jasper James' photography, who does a lot of city scape photography and puts silhouettes over the top of the image. 


I also created my own picture inspired by Jasper James. I used an aerial shot taken of the New York City skyline, and also a picture that I'd taken of my friend, which I changed the transparency on so that you could see the picture of New York behind it. 

-picture- 


------------------------------------------------------------------------------------------------------------

White Balance

White balance is used to correct the colours cast from different types of lighting. For example in fluorescent lighting, subjects may appear slightly green, and by using White Balance you can correct this so that the subject appears in a more natural light. On a DSLR camera there are many different White Balance settings, including; 
  • Auto- This means the the camera will automatically detect the type of light an adjust the White Balance so that it corrects the light.This often shows cooler colours.
  • Daylight - This is for use when shooting outdoors. You can use the Auto setting for any lighting, but if you were taking a picture of a sunset, the auto setting would make the actual colours of the sunset and make them less saturated, making them look a lot less vibrant and spoiling the picture. however, if you use the daylight setting, it will capture all of the colours in the sunset and make them appear just as, if not more, vibrant. This setting shows warmer colours. 
  • Tungsten (also known as Indoor) - This is used when shooting in a house or studio. It has a blue tint to it, which makes the scene look a bit more normal rather than artificially lit. It often shows cooler colours. 
  • Cloudy - The cloudy setting is mostly used for shots outdoors, often when shooting in sunlight. It mostly shows warmer colours. 
  • Incandescent - This is often used when shooting under fluorescent lights. It makes the image warmer and shows warmer colours. 
------------------------------------------------------------------------------------------------------------

Colour Meaning

Colours have different meanings and connotations of what that colour represents. With a different colour comes a different meaning or representation.


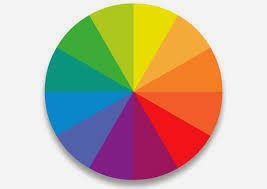
  This is a colour wheel. Each of the colours have different meanings, for example; 
Yellow - Represents Happiness and joy. It also connotes caution, as most caution signs are yellow. Some also say that it connotes cowardice. 


Orange - Also connotes happiness. Can also connote youthfulness and wealth. 

Red - Red represents love and passion. It also represents anger and danger.

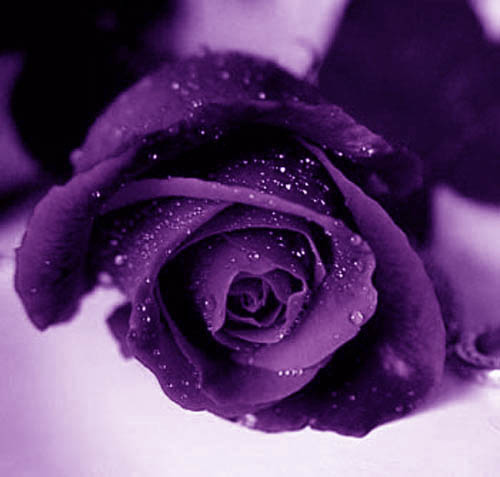
Purple - Purple is seen as quite a royal colour. It also connotes luxury and creativity. 


Blue - Blue is a very calm colour. It represents calm and trust, and also represents nature.


Green - Green is representative of jealousy and envy, however it does also connote nature and can sometimes be quite a soothing colour. 


Black - Black is seen as a very mysterious colour. It is often thought of as a colour that represents evil. It also represents sophistication.